
(Affiliate disclosure: I may receive a commission if you purchase something through links in this post. As an Amazon Associate I earn from qualifying puchases. See more details here:)

Saving seeds from your own garden plants is a great old-fashioned way to save money in your garden, but the process of saving seeds from some vegetables isn't always quite as simple as harvesting the plants at the end of the season and gathering the seeds.
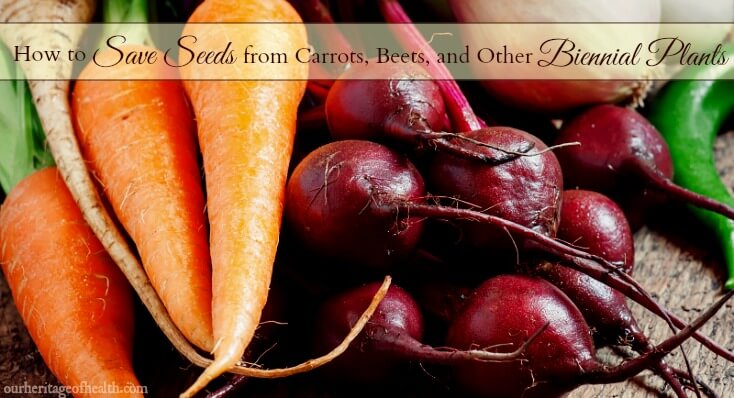
If you're trying to save seeds from carrots, for example, you'll notice that there aren't actually any seeds inside the carrots that you can save the way you would with other vegetables like beans or peas. That's because carrots are biennial plants, so they require two growing seasons to be able to harvest seeds from them.
Biennial plants have a two-year cycle, so in the first year you will see the roots, stems, and leaves growing, and then in the second year you will see flowers growing with the seeds.
So for a biennial plant like carrots, you would need to wait until the second year to be able to harvest any seeds to plant in your garden.
Here is a list of some of the most common biennial vegetables that you might have growing in your garden:
Common Biennial Vegetables
- Beets
- Cabbage
- Carrots
- Celery
- Leeks
- Onions
- Parsnips
- Turnips
How to Save Seeds from Biennial Plants
When you're trying to save seeds from carrots or beets or any other biennial plants, the main thing you need to do is to harvest the mature vegetable at the end of the growing season and find a way to keep it fresh throughout the winter time so that you can re-plant it again in the spring to allow the flowers and seeds to grow.
We'll get to the over-wintering part in just a minute, but first, here are a few things to keep in mind when you're ready to harvest your plants.
Important Tips for Harvesting Biennial Plants
1) Only Harvest Heirloom Open-Pollinated Plants
In order to save seeds that will reproduce true-to-type, you have to use heirloom plants that are open-pollinated. If you try to save seeds from a hybrid plant, it will be very hit or miss as far as what sort of variety your seeds will produce. So, if you try to save seeds from a hybrid variety of carrot, you'll still end up with a carrot, but it won't be the same variety of carrot that you harvested the seeds from, and it may or may not end up tasting good. If you're interested in trying out some new heirloom seed varieties, you can find some of my recommendations for online sources for heirloom seeds here.
Note: If you want to reproduce the same exact variety that you planted, you'll also want to make sure that there was no cross-pollination between the varieties that you planted. So if, for example you planted two different types of carrots right next to each other, it's highly likely that they will end up cross-pollinating, and if you save the seeds from these plants, the carrots that you will grow from those seeds might be similar but not exactly the same as the varieties that you planted. (And carrots can also cross with their wild cousin Queen Anne's lace, too, so that can complicate things a bit also!)
In order to make sure that there was no cross-pollination, you would either need to make sure that you have different varieties spaced as far apart as possible (which isn't always practical for backyard gardeners) or covering the flowers so that the bees can't access them. You can read more about cross-pollination and how to save seeds true to type here.
2) Harvest Your Healthiest, Best Plants
You want to make sure you're harvesting the plants that are the biggest and the best and the most healthy-looking for saving your seeds because you want the plants that you grow from those seeds to also be big and healthy. As much as possible you want to avoid harvesting seeds from diseased or sickly-looking plants or ones that didn't grow very large.
3) Be Careful Not to Damage the Plants you Harvest
You want to try to keep your plants intact as much as possible and avoid nicking or scratching the roots of your carrots, beets, turnips, etc. because any damage to the plants could make it more likely for your plants to deteriorate and rot and they might not survive the winter.
4) Save Several Plants
If you have the space in your garden, it's best to save several plants so that if you run into any problems (like insects, animals, or diseases), you'll have backup options. Even though saving one carrot might give you enough seeds to plant the next year, if something happens to that one carrot, you'll end up with no seeds at all.
Overwintering Your Biennial Vegetables
There are two basic options for overwintering your biennial vegetables:
Option 1: Leave Them In the Ground
The first option is simply to leave the vegetables in the ground throughout the winter, and then in the springtime they will grow flowers and go to seed. This option is definitely the easiest, but not all vegetables can survive outside in the freezing temperatures of winter.
Leaving vegetables in the ground works best for hardy vegetables like parsnips and leeks. (If you live in a mild climate, other vegetables may be able to stay in the ground as well.) Parsnips are especially delicious if you leave them in the ground over the winter because the sugars develop in them and they are nice and sweet. I left all of my parsnips in the ground last year and then sauteed them with butter and maple syrup, and they tasted more like a dessert than like a vegetable!
If you're going to leave your vegetables in the ground, you'll want to cover them well with mulch, especially if you live in a climate with cold winters.
Option 2: Harvest and Store for the Winter
The second option is to harvest your vegetables and store them throughout the winter so that you can re-plant them again in the spring.
After you harvest your vegetables, you'll want to cut off the green tops of the root vegetables to about ½ an inch. For cabbages, you can take off some of the large outer leaves if you want, but you'll need to leave the ball and crown intact.
For the root vegetables (beets, carrots, onions, turnips) and for cabbages, it's best to store them in a cool and humid place. Traditionally, root vegetables and cabbages were stored in root cellars, usually in bins filled with sand because sand provides the right amount of moisture and the root cellar keeps them at the proper temperature. I've learned a lot of information about biennial plants from Old Sturbridge Village and I've seen the root cellar they have at one of their farm buildings where they store vegetables in bins the old-fashioned way.
If you don't have a cool cellar, you can replicate a root cellar by filling boxes or bins with sand and storing your root vegetables in layers. Ideally, you don't want any of the vegetables to be touching each other since that could encourage spoilage faster, and you would want to cover each layer of vegetables with a layer of sand. It's also important to use river sand rather than beach sand because the higher salt content in the beach sand will dry out the vegetables.
If you don't have access to river sand, you could also try just keeping the vegetables in a box or bag in the cellar if it is cool enough, but it may not work quite as well.
Another root cellar alternative is to dig a hole a couple of feet deep in the ground and place a bucket in the hole filled with your vegetables and covered up with soil.
And, finally, you could also try keeping your vegetables in plastic bags in the fridge with holes poked in the bags. (It's important to keep the vegetables inside a bag because if you just place them in the fridge as is, they will dry out and wither. Storing your vegetables in the fridge isn't always ideal because most of us don't have a lot of extra room in our fridges for keeping vegetables throughout the winter (especially if you were trying to save something large like cabbages!) but it's a possible option if other alternatives didn't work for you or if you have more than one fridge.
Planting and Harvesting Your Biennial Vegetables
In the spring once the ground has thawed, you can plant your vegetables, putting them in the ground so that the top or crown of the plant is at the surface. For planting cabbages, if the ball seems to be very tight, it might be helpful to cut an X at the top to help the flower stalks to grow.
Once your vegetables are planted, you simply water them like any other plant and wait for the flowers to grow. Then, once the flowers have gone to seed, you can harvest the seeds, dry them, and store them for the next season.
You can store the seeds in paper bags or envelopes (making sure to label them so you remember which seeds go to which type of plant), and then they will be all set for planting in your garden the following spring.


(Lori Elliott is a participant in the Amazon Services LLC Associates Program, an affiliate advertising program designed to provide a means for us to earn fees by linking to Amazon.com and affiliated sites.)
The information in this post is not to be taken as medical advice and is not intended to diagnose or treat any disease.