
(Affiliate disclosure: I may receive a commission if you purchase something through links in this post. As an Amazon Associate I earn from qualifying puchases. See more details here:)

For years I avoided trying a grow light at home because I had figured it would probably end up being expensive and complicated and would take up a lot of space. I hadn't really thought it would be possible to have a DIY grow light system that would be both simple and cheap at the same time. So I stuck to direct sowing seeds outdoors when the weather was warm enough and buying seedlings for plants like tomatoes that I couldn't direct sow in my gardening zone.
One of the problems I always ran into when buying seedlings, though, is that there is a much more limited variety available for seedlings than for seeds. For tomatoes, for example, there are dozens of different tomato varieties available as seeds, but there is much less variety for seedlings.
I wanted to try some harder to find, more obscure tomato varieties, like the Large Red tomato which was one of the most common early 19th century tomato varieties and Hartman's Yellow Gooseberry tomatoes, etc. but I don't find those varieties as seedlings where I live. So my only way to grow some of those less common varieties would be to start my own tomatoes from seed indoors. (And if you're looking to try some new heirloom seed varieties, you can find some of my recommendations for sources for heirloom seeds here.)
So last year I finally decided to give indoor seed starting a try so I could grow the varieties I wanted to grow and have fun experimenting with trying new varieties that are harder to find. And, as an extra bonus, since the price of buying seedlings can add up, starting my owns seeds at home also saved some money, too, since starting your own seeds at home is great way to save money on your garden.
Cheaper Versions of Grow Lights
Even though I was afraid that a grow light system would end up being really expensive, when I started looking into more, I realized that there's a wide variety of different grow lights with quite a range of different prices too. It's definitely possible to spend a lot of money on grow lights and to have a really elaborate system, but it doesn't always have to be that way. There are many simple grow lights that are very reasonably priced.
If you're looking to start a lot of different seeds indoors or if you get a really fancy grow light, then the price for buying grow lights can really add up. But if you just want a start a few seeds to try out unique varieties and if you stick with a simple grow light system, then it can actually be quite affordable.
The Cost of My Grow Light System
The cost of the grow light that I have was around $37 (At the time it was purchased. The price might be different now.) And then I got a large bag of organic potting soil that was about $11. (Note: a lot of people say that for starting seeds indoors, it's really best to use a finer soil that's designed for seed starting rather than regular potting mix, but since potting mix was what I had conveniently available at the time I used that and I was still able to start seeds successfully.)
Seed starting mix is ideal for smaller seeds since it has a finer texture than potting soil does. If you use a seed starting mix, though, you will need to add some type of fertilizer to it once your seedlings have sprouted and are starting to get their true leaves. I've made the mistake before of getting seed starting mix without realizing that I would have to add fertilizer to it, and my poor little seedlings didn't grow at all past just a couple of inches tall and by the time I realized my mistake it was too late in the season to try to add fertilizer to help the tomato seedlings to grow and I ended up having to buy some seedlings from a garden center.
I also ended up doing an unintentional experiment one year with different types of potting soil because I had bought some organic potting soil that didn't have much fertilizer in with it. I think it was intended more for use with plants that were already established. And then I had some old leftover potting soil of a different brand from a previous year and I decided to use it to fill a couple of my containers. The older soil that I had used a couple of years ago worked much better and my seedlings were really thriving with that soil. The other ones were growing much more slowly because they just didn't have enough fertilizer to give the plants the nutrition that they needed. This is the type of potting soil that gave me the most success with my seedlings, and because it has the right amount of fertilizer but also seems to work ok for starting seeds, I think I'm just going to stick to using it from now on. (If you are able to find it a a local garden center you can probably find it for a better price than getting it online.)
For containers, I just reused some empty water gallon containers, so I didn't even have to buy any plant pots. And then the only other expense was just the cost of seeds, which would vary depending on how many different varieties you want to plant and whether or not you saved seeds from your garden from the last year or not.
So for less than $50 (not including the cost of seeds) I had a grow light system that worked perfectly for my seed-starting needs. And now that I've already bought the light, for this coming year my seed-starting expense will be much lower because I'll only need to buy a bag of soil and whatever seeds I decide to plant.
Note: Many seed starting resources also recommend using some type of heat mat to keep your plants at a warm enough temperature, so that could be an additional expense if you decide to try using one. I personally did not use one for my seeds and they still thrived anyways even though I planted mostly tomatoes and they like warmer weather, so in my opinion it's not absolutely necessary. If the room where you're planning on starting your seeds is very cold, then it might be a good idea to use a heat mat. Otherwise, though, if you're trying to save money on your seed starting system then you might be able to get away without using a heat mat like I've been able to do.
How I Set Up My Grow Light System
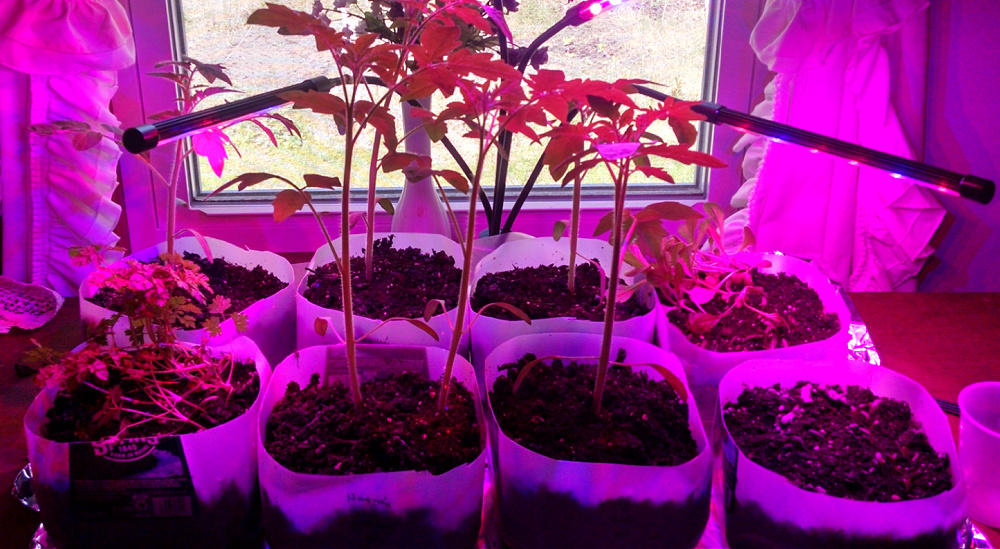
The type of grow light I ended up getting was one that had four lights on arms that could be bent at different angles and adjusted to different heights. There are more elaborate grow light systems that have adjustable frames for the grow lights that can end up being fairly expensive, but these cheaper gooseneck-style lights were perfect for what I was trying to achieve. Being able to bend them in different directions and lower or raise them as needed allowed me to have the right amount of light for different plants that were taller or shorter.
In the picture at the beginning of this post, you can see how I was able to bend the grow lights so that some of them were closer to the shorter seedlings, and the ones that were above the tomato seedlings were higher to give the tomato seedlings more room.
This is one type of grow light that I used for starting my seeds. I have a second grow light that I had bought, too, that is very similar to this style. It's not exactly the same, but it has the same look with the four bendable lights and ability to clip onto a desk or table, etc. It seems like there are a lot of similar grow lights in that sort of style.
For plant pots, I used empty plastic water gallon jugs by cutting the tops off of them and poking holes in the bottom. Empty milk gallon jugs would work perfectly fine too as long as you wash them out first. You can also recycle other types of containers, too. You just want to make sure that you create some type of drainage holes in the bottom.
It's usually recommended to start seedlings in smaller pots and then transplant them into larger pots as they grow, so the way that I do it with planting them in the bottom part of a gallon container isn't what most people recommend. I've heard that there is less chance of having issues with too much moisture causing problems if you use smaller containers, but since I haven't had an issue so far I've continued to use this method rather than getting new containers for starting seeds. So, I don't necessarily recommend starting with gallon-sized bottles since it's sort of a try-at-your-own-risk sort of method, but I'm just sharing what I've been doing with what I had easily accessible and what's been working for me. If you had smaller containers that you could re-use then you could use those instead.
Underneath the homemade plant pots, I put some aluminum foil to catch any water than might have leaked out (you could also use some type of mat if you have one that would be the right size.)
I also put an old board underneath my plants because it gave me a place to clip my grow light onto. The grow light I bought is the kind that clips onto the edge of a table or desk, but the old dresser that I was using for my grow light setup didn't have enough of an edge for the clip to hold onto. So I put the old board on top and let it overlap enough to create the edge I needed to clip on the grow light.
Some of the more expensive grow light options have self-contained stands that can sometimes be more convenient, but I found that the cheaper clip-on version was perfectly fine for my needs.
Once my light was all set up, I planted my seeds and then did one of the most important steps which is to make sure you label your seed pots! Labeling might not be as necessary if you're only planting one or two different types of seeds, but if you decide you want to try six different varieties of tomatoes then it's going to get really confusing later on trying to remember which ones are which, especially when you start moving the pots back and forth from inside to outside to harden them off.
How My Grow Light Worked
I was very pleased with how well my grow light system worked to grow my seedlings. I mostly grew tomato plants, and they did just as well and even a little bit better than some of the tomato plants I bought as seedlings. This picture is one I took in June and my tomato seedlings were already quite tall and full of flowers and baby tomatoes.
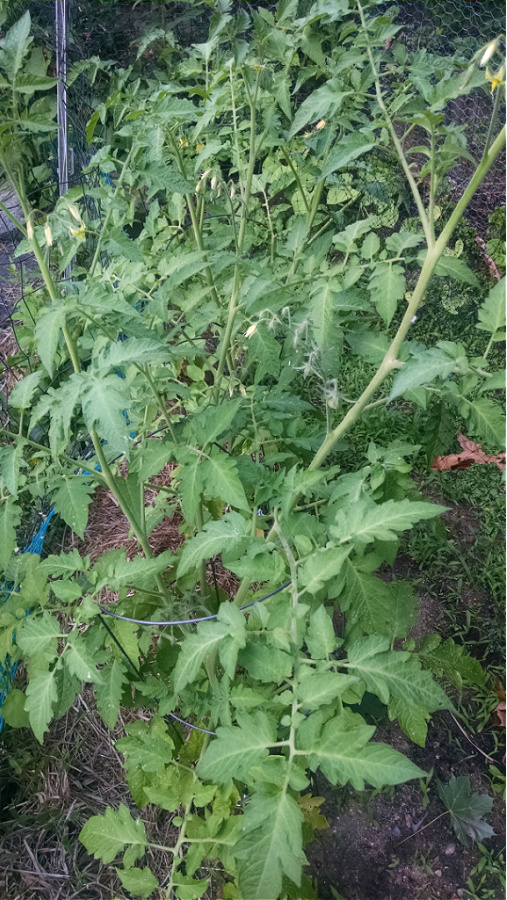

One of my tomato plants was planted up against a tall wire fence, and it started to use the fence as a trellis and it just kept growing and growing and producing tomatoes up until we had a frost.
I'm definitely planning on using this grow light system to start my own seeds again this year, and looking forward to home-grown tomatoes again!
(This post is focused mostly on creating your own simple and cheap grow light system if you already know the basics of seed starting, so if you want more information about how and when to start your seeds, this article has a good overview of the seed starting process.)


(Lori Elliott is a participant in the Amazon Services LLC Associates Program, an affiliate advertising program designed to provide a means for us to earn fees by linking to Amazon.com and affiliated sites.)
The information in this post is not to be taken as medical advice and is not intended to diagnose or treat any disease.