
(Affiliate disclosure: I may receive a commission if you purchase something through links in this post. As an Amazon Associate I earn from qualifying puchases. See more details here:)

After a couple of recent trips to living history museums and seeing examples of hand-dyed yarn, I was inspired to do some experimenting of my own with natural dyes.
I had heard before that it was possible to dye yarn with berries, so I decided to give them a try as a natural dye for my yarn. Once I did a little research to find out how to do everything, the process of dying the yarn actually wasn't as hard as I had thought it would be. There are a lot of steps involved, and it takes a little while to do it, but it was a lot of fun to try a new DIY project and to see what it's like to dye yarn the old-fashioned way by hand.
Before you actually dye your yarn, though, there are steps you have to take to prepare the yarn for the dyeing process.These are the steps I used for preparing my yarn:
How to Dye Yarn with Berries: Preparing the Yarn
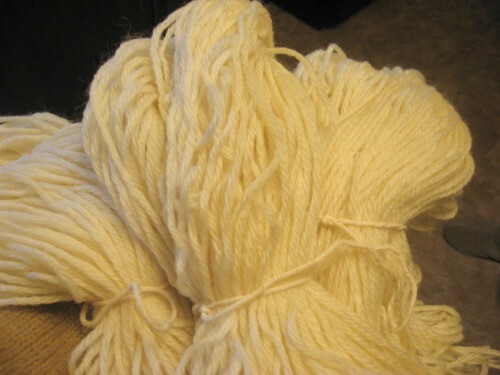
Step 1) Buy the right yarn.
First, you want to make sure you have enough yarn to complete the project you have in mind. When you're working with natural dyes, you can't always predict exactly what color the finished yarn will turn out. Even if you use the same ingredients, each batch will come out slightly different, and you don't want to end up knitting half a scarf with one shade of pink and then knitting the other half with a slightly darker shade because you used yarn from two different batches.
Step 2) Divide the yarn into smaller skeins.
Once you've bought your yarn, you need to unwind the entire skein. If you throw the whole skein right into the dye pot like it is, it might be too thick and too tightly wound for the dye to reach the middle of the skein. Then you'd end up with a beautifully dyed outside and a white middle.
I made my 8 oz skein into five smaller skeins. To make the skeins, I just kept wrapping the yarn in a loop around my hand and elbow the way you would loop Christmas lights for storage to keep them from tangling. Then I tied each skein with a piece of string, making sure it was tight enough to keep the skeins from falling apart but still loose enough to allow the dye to reach the entire skein.

Step 3) Wash the wool.
Because the wool's natural oils could interfere with the the dye's ability to penetrate the yarn's fibers, you need to give it a quick wash. I put my skeins into a big pot filled with water and heated it until it was just warm but not hot. Then I put in a little bit of natural liquid soap. You just don't want to use water that's too hot or soap that's too harsh, so warm water and a mild soap like castile soap work well. Then just leave the yarn in the pot for thirty minutes to an hour, stirring it gently every once in a while. (And rather than regular stirring, you want to just gently poke at the yarn to move it a bit because if you agitate the yarn too much it can felt.)
Step 4) Rinse the wool.
Once the yarn has sat in the soapy water for thirty minutes or so, give it a rinse in the sink to wash out any soap residue. Try to use a similar temperature as the water from the pot so you don't shock the wool fibers. This can weaken the yarn and cause it to felt apart more easily when you're trying to knit with it. (The temperature of the water doesn't have to be exact, but just try not to go from really hot water to cold water suddenly.)
Step 5) Find a Mordant.
A mordant is an additive that will help the dye to adhere to the wool. Some natural dyes are called substantive dyes, meaning that they don't need a mordant to help them stick to the fibers, but, even if you're using a substantive dye, using a mordant can help the dye stick better and to have a brighter color.
Step 6) Mordant the Wool.
This is the part where you want to be a little bit careful. If you use too much alum, the wool will get a sticky feeling to it that doesn't wash out. You can also a add a bit of cream of tartar to help the alum work more effectively. The amounts I used were, for 8 oz. of wool: 2 Tbs alum, 1 Tbs cream of tartar.
To mordant the wool, put the skeins that you have already rinsed in a large pot with enough water to completely cover all the wool. I've read that soft water works best, and that, if you don't have soft water, you can put a spoonful of vinegar in to soften hard water. (Update: Since writing this, I have used hard water successfully for mordant my yarn without adding the vinegar, so I no longer add it to my water.)
Put in the alum and the cream of tarter and stir it around a bit to mix them in. Then let the wool simmer in the mordant solution for about an hour (simmer, not boil!).


Step 7) Let the Wool Cool.
Once the wool has simmered in the mordant solution for an hour, turn off the heat and let it sit in the solution overnight (or for several hours at least.) The next morning, take the yarn out of the solution and rinse the skeins. Then you can either hang the skeins somewhere to dry or you can go right ahead and start dying your yarn.
At first glance, it might seem like a lot of steps to prepare the wool, but it really isn't hard to do. You just have to have a bock of time where you'll be home to check the wool while it simmers in the pot to make sure it doesn't boil.
In my next post, I describe the method I used for dying my wool with blueberries and cranberries.


(Lori Elliott is a participant in the Amazon Services LLC Associates Program, an affiliate advertising program designed to provide a means for us to earn fees by linking to Amazon.com and affiliated sites.)
The information in this post is not to be taken as medical advice and is not intended to diagnose or treat any disease.